
Have you ever looked at a full loaf of bread and thought to yourself, “Wow. It’s going to be a lot of work to cut into that sucker!”?
Maybe not, but somebody obviously did. Hence, sliced bread.
But what if the bread was already sliced before you even baked it? Then you could just pull it apart right? Not only that, but you could layer delicious things in between the slices and make Bacon Cheese Pull Aparts.
It’s homemade bread for people that are too lazy to slice. Now that I think about it, I’m not really sure those circles overlap on a Venn diagram.
Bacon Cheddar Pull Apart Loaf

Equipment
Ingredients
Basic Enriched Dough:
- 1 teaspoon dry active yeast
- 1 tablespoon sugar
- 2 tablespoons lukewarm water
- ¼ cup warm milk
- 1 large egg
- ½ teaspoon salt
- 2 tablespoons unsalted butter, soft
- 1 ½ cups all-purpose flour
Filling:
- 1 cup cheddar cheese, grated
- ½ cup crispy crumbled bacon
- ¼ cup chopped chives
- 2 tablespoons butter, melted
Instructions
To make dough:
- Stir yeast, sugar, and water into a mixing bowl. Let sit for ten minutes until it’s foamy and all the yeast is dissolved.
- Stir in milk, eggs, soft butter, and salt. Once combined, stir in flour.
- Stir together until dough forms a ball and then knead with your hand in the bowl for a few minutes until the dough is nice and soft. If it is very sticky, add more flour by the tablespoon.
- Add dough to a clean metal bowl and dust with flour. Cover and let rise for 90 minutes until it doubles in size.
To make filling:
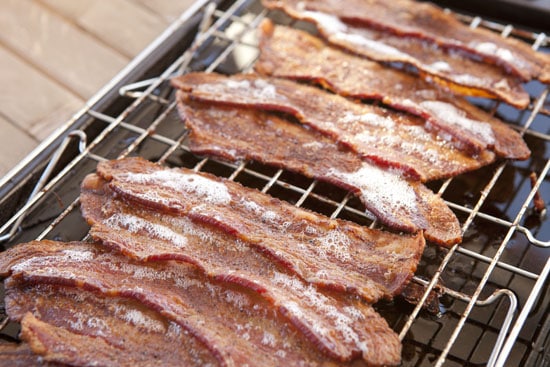
- Cook bacon until it’s very crispy. I prefer to cook my bacon in a 350 degree oven, but you can also cook it in a skillet over medium heat. You’ll need 6-8 strips to make enough crumbles for this recipe.
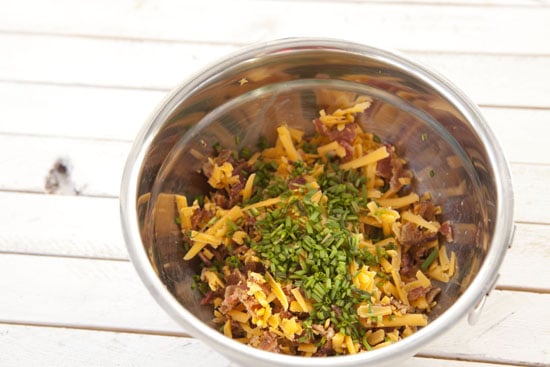
- Combine bacon, cheese, and chives in a small bowl and crumble them together so the cheese and bacon are both evenly sized.
To make Loaf:
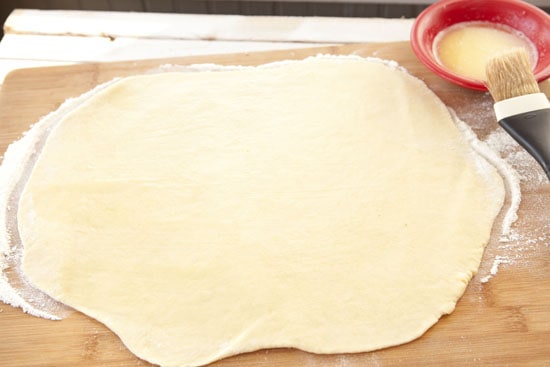
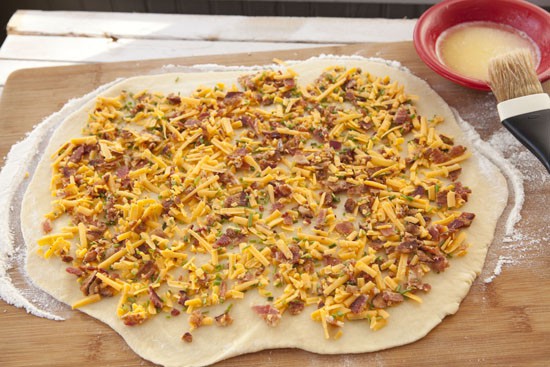
- Preheat oven to 350 degrees. Roll dough out on a lightly floured surface until it’s in about a 12×16 inch rectangle. Brush dough with melted butter.
- Sprinkle filling evenly over the dough and cut into three even strips. Then cut those strips into about 1 inch strips.
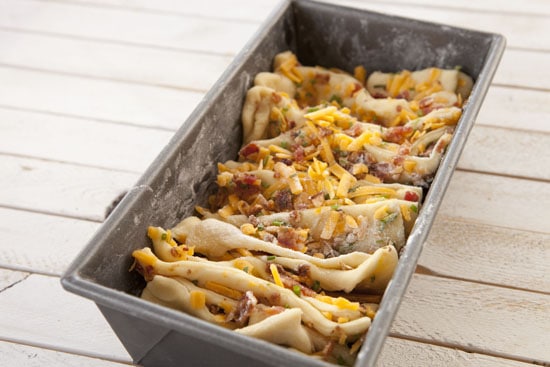
- Stack strips up and fit them into a loaf pan that has been lightly butter and floured.
- Cover loaf pan and let the dough rise a second time for 30 minutes.
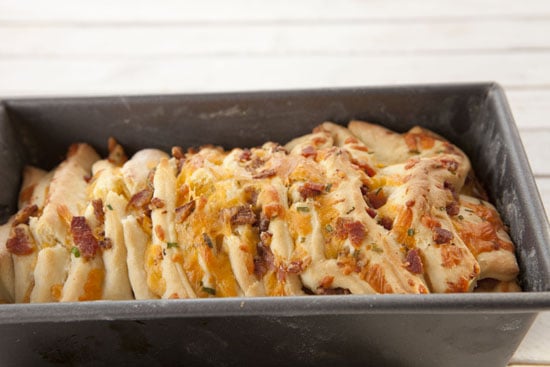
- Bake loaf at 350 degrees for 30-40 minutes until it’s cooked through in the center.
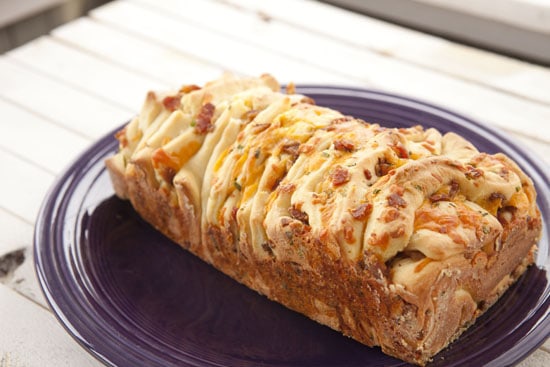
- Remove from oven and let cool briefly, then remove dough from pan and let cool for 5-10 minutes.
- This loaf is best served warm.
Nutrition
Did you make this recipe?
Bacon Cheese Pull Aparts
The Dough
I like a nice soft dough for these so I modified my cinnamon roll dough recipe to be not as sweet. The dough is really easy to bring together and is very soft thanks to some milk and an egg.
Start by stirring together the water, yeast, and sugar in a medium bowl. Let this sit until the yeast dissolves and it starts to bubble. Then stir in the milk, egg, salt, softened butter, and finally the flour.
You don’t need a fancy mixer to make this dough. Just stir the ingredients together until they form a ball and then knead it vigorously with your hand for a few minutes in the bowl. After a few minutes you should have a nice soft dough that’s ready to rise. If the dough is too sticky, feel free to knead in a bit more flour by the tablespoon.

Cover the dough loosely and let it rise for about 90 minutes. It should about double in size.
Then lightly flour a clean surface and roll the dough out into about a 12×16 rectangle. It doesn’t have to be exact. Part of the charm of this loaf is having some awkward edges.
The Filling
I went with a savory filling for this version, but there’s absolutely no reason why you couldn’t go sweet. You could use a standard cinnamon roll filling or maybe even my date cinnamon roll filling which is my personal favorite. If you do make a sweet version, you should probably cut in half whatever recipe you use.
If you go savory though, I highly recommend cheddar, bacon, and chives. It’s very hard to go wrong.
You want to make sure your bacon is very crispy though so I recommend cooking it how I cook bacon. After baking for about 20 minutes, you’ll have some really crispy pieces. Try to resist eating them all right away.
Crumble the bacon really well and add it to a bowl with some grated cheese and minced chives. Use your fingers to crumble this all together.
Making the Loaf
Brush your rolled out dough with some melted butter and then completely cover the dough with the filling. I left a bit of space around the edges, but you don’t really need to do this. You can go all the way to the ends.
Now you need to slice and stack these pieces in a loaf pan!
Please ignore the way I did it because the pieces didn’t fit perfectly in my 9×5 loaf pan. Using the red lines should give you a much better fit.

When your pieces are cut, just layer them side-by-side in a loaf pan.
Before you add the stacks into the pan, be sure to lightly butter and flour the pan. That will prevent the loaf from sticking after it bakes.
Planning is a skill!
I made this loaf in one morning and it takes 3-4 hours straight through. If you wanted to cut down on this morning-of time, you could make the loaf up to this point the day before. Stack all the pieces in the loaf pan, cover the thing, and stick it in your fridge overnight.
When you’re ready to bake it, preheat your oven to 350 degrees Fahrenheit and let the loaf rise a second time for about 30 minutes.
Then bake the loaf in the center of the oven for 30-40 minutes until it’s nicely browned on top and cooked through.
Let this cool in the pan for a bit and then you should be able to run a knife around the edges and remove the loaf.
You want to let this continue to cool for a few minutes before peeling into it, but this is definitely a loaf that you want to serve while it’s warm!
There you have it!
If you like homemade bread, but are too lazy to cut it yourself, this is the loaf for you!
Ashrita
Yes, I have made the Monkey Bread from your site! :D Here! http://www.caramelwings.in/2012/06/chocolate-chip-monkeysticky-bread-this.html
Nick
Nice! I love that recipe also.
Dan
This is too brilliant for me wrap my head around. I must make it.
Scott
hey! I subscribed to your emails sometime last year and frankly I really enjoy every post. made the bread today to go with a cream of vegetable soup – both are nice and savoury. we added a spoonful of the sour cream that should always accompany bacon,cheese and chives to the soup when serving. needless to say, so much for our low fat new year resolution. Maybe a government someone will declare that bacon is fat free and we can all live in a world full of bacon-filled bliss.
Cheers and thanks for the posts.
Scott and Marc in NB, Canada.
Nick
Ha! Thanks for reading Scott!
virginia
Mmmm, mmmm. Made the dough yesterday and the bread this morning and we were in bacon/cheesy heaven. I will say though that your directions perplexed me a bit. When you said to layer the pieces side by side, I felt it was a little unclear. My husband thought it meant to stack them (because later you said stack) and I didn’t think that was right, but thought that maybe you put them in the pan with a food side next to a bread side. Anyway, as I made this, the obvious choice to me was to take each piece and fold it in half like a taco and then put those pieces side by side in the loaf pan. With the bread side to the bread side. Worked like a charm and I sprinkled the extra bacon and cheese on top of the whole thing and may have even drizzled the last of the melted butter over the whole thing before baking. One word: awesome. Worked great for me, making the dough the day before and then assembling the thing in the morning before baking. I love this dough, too. It has a great feel and will be very versatile. Already thinking of other ways to use the dough. Thanks for a kick ass food blog, you’ve become one of my go-tos and I have made a bunch of your recipes.
Nick
Hey Virginia! Thanks for trying it out. I think the layering is pretty flexible. I “stacked” mine so it was bread/filling/bread/filling/etc, but sounds like your way works great also!
Chris
Now that is a loaf that I’d like to pinch! I mean I’d like to pinch a piece off of that loaf. Never mind, it all just sounds bad ;)
Nick
Clearly we both have the sense of humor of a middle schooler. :)
Chris
and by “it” I meant my comment. The recipe sound tasty!
Chris
Except it has bacon in it. How could you use bacon you heartless, cruel person? (ha ha ha)
Heather
We made this for dinner last night and my partner said it was the best bread he’d ever had. I didn’t even pull it off perfectly (over cooked it a little, didn’t put the butter between the slices) and he still loved it.
Nick
Sweet! Yea… it’s pretty flexible. :)
Heather
Also, my bread pan is like, twice the size of yours, so a bunch of my pieces fell over in the oven. Oh well!
Nancy @ gottagetbaked
Have mercy! I love every single component in this amazing recipe – you can’t go wrong with packing carbs full of bacon, chives ‘n cheese. It must’ve smelled incredible as it was baking and I can just imagine how delicious it tasted. The Husband and I would’ve hoovered this down in one sitting.
Nick
Ha! Thanks Nancy. yea… it was very delicious and baking it was hard because it smelled so good!
Abby
bread tasted Awesome!! I would recommend letting the dough rise longer. Otherwise, it was a big hit with my friends!
Rachel
Just made a vegetarian version of this with smoked cheddar and red onions fried in butter with paprika. As my partner said, “That’s good shit!”
Mandie
I made this early one morning for breakfast, and took leftovers out with us to go fishing. There is just not a wrong time to cook or eat this recipe!! Absolutely fail safe (I should know) and tastes BEAutiful!!!!
Nick
Woohoo Mandie! So glad you liked it!