
It’s my opinion that it’s near impossible to find a really good hard roll (I call it a Kaiser roll) anywhere in DC and I imagine in many other places. Sure, I know you can find them in New York and honestly there might be a few bakeries in DC that can make them correctly, but I’m not in the mood for a scavenger hunt.
On Memorial Day weekend, I was making something delicious that needed a good hard roll. One that was crunchy on the outside and chewy on the inside. I looked at a few places and wasn’t impressed so I just decided to make some myself. It was a really good idea.
Without a doubt, if you take the time to make some great hard Kaiser rolls, I guarantee it will elevate your burger or sandwich to another level of deliciousness.
Kaiser Rolls
Equipment
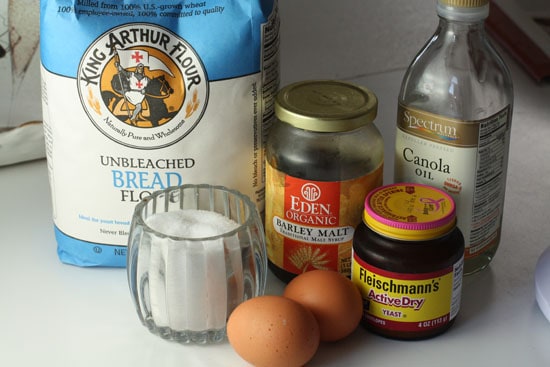
Ingredients
Pâte Fermentée:
- 5 ounces (1 ⅛ Cups) all-purpose flour
- 5 ounces (1 ⅛ Cups) bread flour
- ¾ Teaspoon salt
- ½ Teaspoon instant yeast
- ¾ Cup room temperature water, you might need a few extra Tablespoons
Kaiser Dough:
- The above batch of Pâte Fermentée
- 20 ounces (4 ½ Cups) bread flour
- 1 ½ Teaspoons salt
- 1 Tablespoon barley malt syrup, or 2 Teaspoons malt powder
- 2 Teaspoons instant yeast
- 2 large eggs
- 3 Tablespoons vegetable oil, I used canola oil
- 1 ½ Cups lukewarm water
- Poppy Seeds or sesame seeds for topping
- Cornmeal or semolina flour for dusting
Instructions
- Mix all dry ingredients for the starter in a medium bowl and then add the water. Mix it together until it forms a firm ball. Err on the side of sticky on this. It’s easier to add more flour than more water.
- Knead the starter on a clean surface for about 5 minutes until smooth and soft, but not sticky. Coat the ball lightly with oil and put it in a covered bowl.
- Ferment this at room temperature for 90 minutes and then in the fridge overnight.
- When you’re ready to make the rolls, take your starter out of the fridge and cut it into a dozen small pieces. Put the pieces in a bowl and let them come back to room temperature (probably take an hour).
- Add all your dry ingredients for the dough to a seperate large bowl and mix them together. Then stir in all your wet ingredients and the chopped up starter pieces. Mix this either with a spoon or on low with dough hook until it comes together in a ball. You might need to add more flour if it’s too sticky.
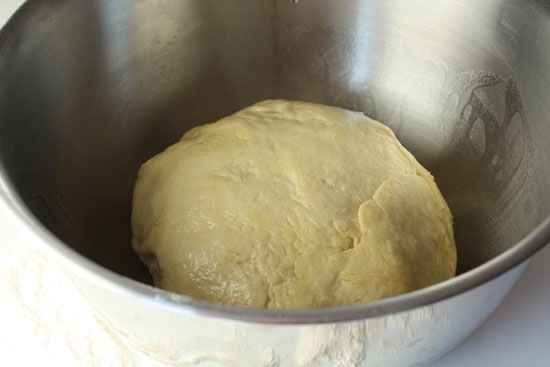
- Knead the dough for 10-12 minutes or mix it on low speed with a dough hook for 6-8 minutes. The final version should pass the windowpane test and be soft but not too sticky.
- Lightly coat the dough in oil and let ferment at room temperature until it doubles in size (90-120 minutes).
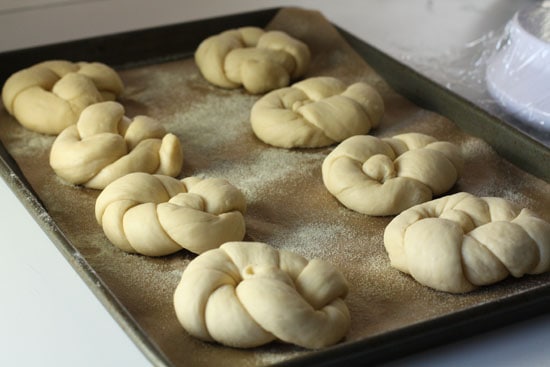
- Form the rolls by sectioning off a 3.5-4 ounce piece of dough. Roll the piece of dough out into a long strand about 18 inches long. Then take the left end and put it over the right end forming a loop. Next, loop the right end through the center. Do the same thing with the left end but in the reverse direction. Then roll both ends through another time and they should basically meet in the center, filling the hole.
- As you finish each roll, add them upside-down to a baking sheet lined with parchment paper. Sprinkle each roll with a bit of semolina flour or cornmeal.
- Let the rolls rise for 30 minutes, then flip them and let them rise for another 30 minutes.
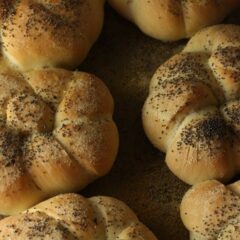
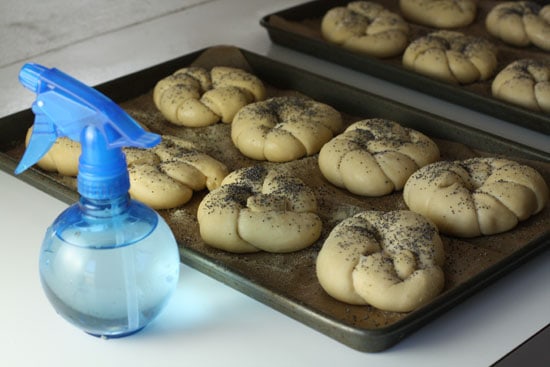
- Spritz the rolls really well with water until they are sticky and top each roll with poppy or sesame seeds.
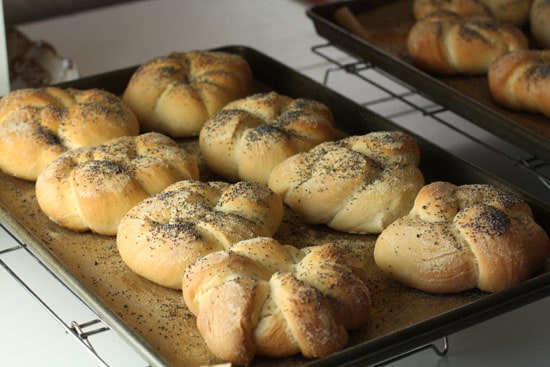
- Bake the rolls starting in a 425 degree oven. Spritz the sides of the oven with water to create steam. Cook for 10 minutes then lower the temperature to 400 degrees and cook for another 20-25 minutes or until they are golden brown.
- Cool the rolls for at least 30 minutes before slicing into them.
Notes
Nutrition
Did you make this recipe?
Note: This is a two day recipe so plan accordingly! It’s not actually that much work… just a lot of waiting.
Making the Pâte Fermentée
This is a fancy name for a dough starter basically. In fact, I’m just going to call it the starter from now on because I’m sick of looking up the special characters. This is similar to the sponge you make when making bagels, but it’s a firmer final product.
To make it, just stir together all your dry ingredients in a bowl and then add your water. Stir it together until it forms a firm ball. It shouldn’t be sticky or stiff, but if you’re worried, err on the side of sticky. It’s easier to add flour than water.
Then roll your dough out onto a lightly floured surface and knead it for about 5 minutes until it’s smooth. It should be soft and smooth but not sticky at all.
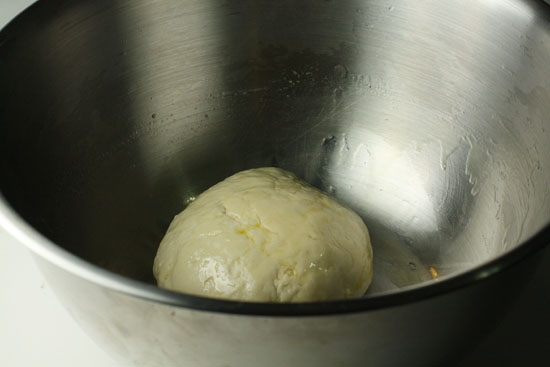
Then lightly oil a bowl and turn the ball around in the oil so it’s coated.
Fermenting the Starter
Cover this and let this rise at room temperature for about 90 minutes. Then put it in your fridge overnight! This will keep in the fridge for 3 days if it’s covered well or you can freeze it for up to 3 months.
Making the Kaiser dough
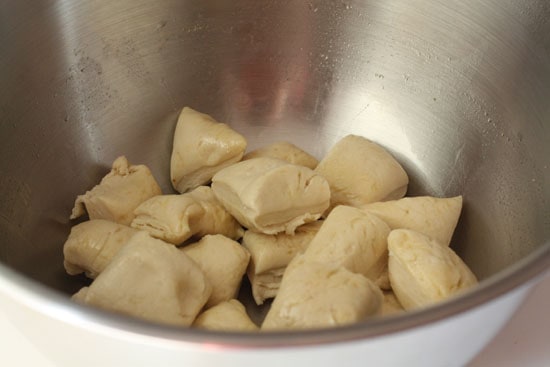
The first thing about this dough is that you need to bring the cold starter up to room temperature. To make this a bit easier (and to make the mixing easier) just chop it up into a bunch of smaller pieces in a large bowl. You can use kitchen sheers, a dough cutter, or even a serrated knife for this.
Let this sit out at room temperature for about an hour to warm up.
Next, add all your dry ingredients for the dough (flour, salt, yeast) to a large bowl. Mix your wet ingredients separately (malt syrup, eggs, oil, water). Then add your chopped up starter to your dry ingredients along with your wet ingredients.
Stir it together with a large spoon or if you’re using a mixer then mix it on low speed with the paddle until it starts to come together. Mine ended up a bit too wet which isn’t a big deal.
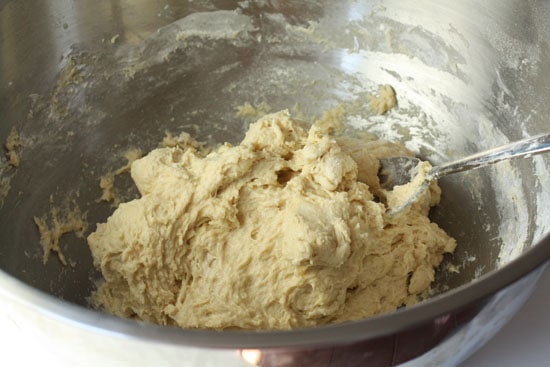
I just kept adding flour until the dough formed a ball which was about another 1/2 Cup for me.
Then you can either mix this on medium with the dough hook (6-8 minutes) or if you’re doing it by hand, roll it out onto a floured surface and knead it for about 10-12 minutes until the dough is soft and tacky but not sticky at all. If it’s too sticky, keep kneading in extra flour until it’s not sticky.
The final dough whether you use the mixer or by hand should pass the windowpane test.
Fermenting
Once your dough is ready, oil a large bowl and roll the dough ball in the oil to coat. Then cover it and let it ferment at room temperature until it doubles in size which should take about 90 minutes to 2 hours.
Shaping the rolls
To make really even rolls, it’s almost essential to have a kitchen scale so you can weigh each roll before shaping it. You can of course eyeball it, but your rolls are probably going to be a bit uneven.
I went with a 3.5 ounce roll. I wouldn’t go larger than 4 ounces.
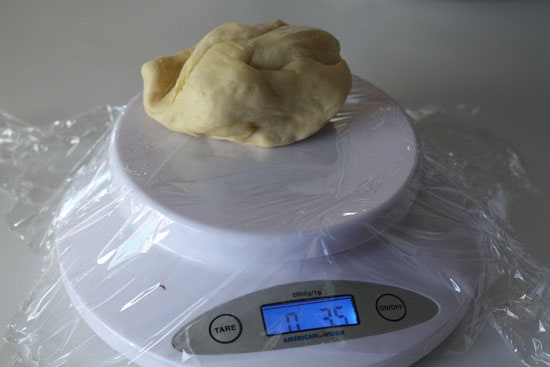
Once you have your dough weighed, shaping these guys isn’t too hard. Just try not to freak out if they aren’t all perfect because they probably won’t be. This is how I shaped mine.
I rolled my dough out into a long strand about 18 inches long. Try to keep it as even as possible. It should roll really evenly. Just use your hands.
Then take the left end and put it over the right end forming a loop (top left). Next, loop the right end through the center (top right). Do the same thing with the left end but in the reverse direction (bottom left). Then roll both ends through another time and they should basically meet in the center, filling the hole (bottom right).
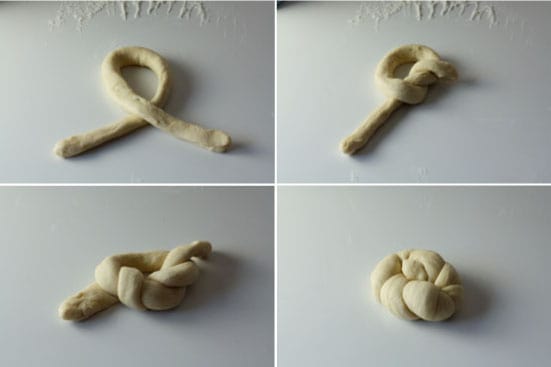
Once you finish one, add it upside down to a baking sheet lined with parchment paper and sprinkled with some cornmeal or semolina flour. If you look at mine carefully you can see that I messed some up, meaning that there are a few ends that don’t meet in the middle. They all baked up fine though so don’t stress out about it too much.
Second Rising
Once you get them all shaped, let them rise for 30 minutes, then flip them so the top of the roll is up and let them rise for another 30 minutes.
Topping the rolls
Before baking the rolls, it’s important to spritz them all with water. This gives them that crunchy texture after they get done baking. Since you’re going to spritz them all with water, you might as well sprinkle on some delicious toppings. I went with poppy seeds.
Baking the Rolls
To bake these right, preheat the oven to 425. When you put the rolls in the oven, spritz the sides of the oven with water also to create some steam in the oven. Bake them for 10 minutes. Then reduce the temperature to 400 degrees and bake them for another 20-25 minutes, depending on how large you make them.
They should be golden brown and sound kind of hollow if you thump them.
These were perfect.
Cooling the rolls. As with most baked things, these need to cool for a while before you eat them. Cool them for at least 30 minutes. It gives the crust a chance to form and also lets the center of the rolls set up a bit. It’s really important to cool these on a rack if at all possible.
Then you can slice into them!
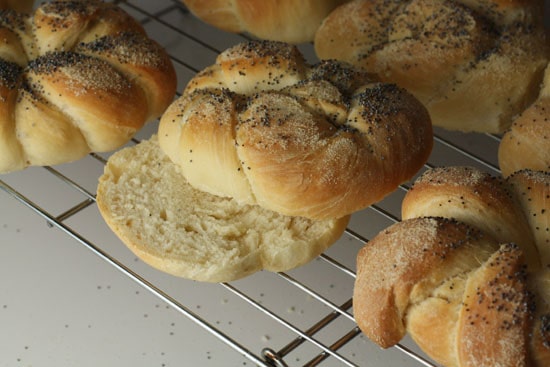
These were my exact definition of a good hard roll. They were worth the extra work.
Want to know what I did with them? Here ya go!
Dad gansie
Wow. They look good. Bet tasted even better
hell, when we gonna see you on TV?
Man your good
Nick
As soon as I get invited ;)
Adrienne
Nick, these look great! I've got a bunch of dough in the fridge now that I'm planning to turn into burger buns (I've made burger buns before but it was a specific recipe and now I'm winging it). The point is: thanks for the 3.5 ounce suggestion, now I know where to start!
matt
i love your buns
Lauren @ Healthy Del
Are you kidding me?!?! First off, those look totally professional. Second, do you have any idea how much time I spend seeking out the perfect hard roll in local stores/ bakeries to no avail? I will be making these. Soon.
Olga @ MangoTomato
Super duper pretty! Love the poppy seeds on the top. These will be so good for so many sandwiches.
The Nervous Cook
Wow, you made the perfect kaiser rolls! You made the kaiser rolls of my dreams, of my memories. Of my afternoons getting out of school but on the way to work need-a-snack-grab-a-kaiser-roll.
They look incredible. They're just begging to be turned into a tun sal sand.
Georgia
Beautiful. Another one that needs to be on Foodgawker. They DO look professional. I’m going to try making them…
Mercedes
What is the malt for? Sweetener, or something to do with bread chemistry..? I don't have any so I'd like to know what my substitution options are, if any. Please hit me back, if you've got time, I'd love to make these! Thanks!
Nick
Yea… the malt is just a liquid sweetener. It's pretty common in some baked goods like bagels, rolls, etc. It does more than just sweeten though, it also keeps the bread moist.
You can definitely substitute it though. Check this page out for a few substitution options. I'm not sure I would do the maple syrup as that might make your rolls really sweet, but the molasses I think would work fine.
http://www.foodsubs.com/Syrups.html
Good luck. Let me know how it goes!
Mercedes
I used whole wheat and honey instead of malt — they're delicious and beautiful. Thanks for the recipe! I also made your blintzes the other day and the batter was perfect — I tried making Bittman's crepe recipe a few weeks ago and it went all wrong.
On a separate note: Do you have any curry recipes you recommend?
Nick
Sorry it took me forever to reply to your question, but yea… I have some good curry recipes that I like.
If you're looking for a green curry that isn't too spicy, this one is really nice. You can make it spicier by adding more chilis. https://www.crunchtimekitchen.com/2010/06/green-chicken-cu…
More recently though, this mango chicken curry is way up there on my list. It's a bit sweet, but really flavorful. I made it with a breakfast dish actually but Betsy and I ate it with rice a few times since then. When I make it for dinner now though I leave out the brown sugar in the recipe so it doesn't get too sweet. https://www.crunchtimekitchen.com/2010/09/savory-pancakes-…
Juanita
These look delicious! I want to give this a try but if I make them all at once, I KNOW my boyfriend and I will just go through them in no time!
You mention that the Pâte Fermentée can be frozen for up to 3 months. How about the whole Kaiser dough? If I were to split the finished dough in four parts and freeze three of the four parts, could it work?
Or if I shape them all into Kaisers then freeze some of them, take some out as needed and thaw and do the raising on thawed Kaisers, do you think that would work? Many thanks!
Jeremy Spiers
I made them the way you did, except I used all bread flour, which already has malted barley in it, rather than whole flour with the malt. Also, I made a sponge and let it ferment, but used it right away. They turned out excellent, especially the crust on the outside. The suggestion to spray water in the oven for steam beats trying to set a pan of water in there, and gives it just enough steam. Excellent!
David, Kennewick, WA
I have never baked before but these came out awesome!!! I took some to the office and they were gone in about 1/2 hour. My mother in law ate 4 in a matter of 24 hrs!!! A great tip regarding the malt syrup. If you live in or near a town/city that has home brew supplies you can get malt syrup there..They will have different kinds. I make home made beer and had some as I couldn’t find any at the grocery stores. Or maybe you have a buddy who does home brew. Just ask them for some. The tablespoon of syrup wont make a difference to the guy making the beer.
Nick
Great tip David. Thanks!
Caryn
Mine turned out a little too hard… any tips?
RobP
I just made these, but using olive oil dough from ABin5 and adding 2 tbsp of egg to the dough. The next day I proceeded the same way, not hesitating to use flour as Kaiser Rolls are a lean dough. I didn’t eat one yet, but they sure look good. I’ve made them before using “Norm’s ” recipe from The Fresh Loaf.
Mel
I just made these with no malt barley syrup and I substituted some of the bread flour with about 3/4 cup whole wheat flour – they were great – the most difficult part of this recipe was making them all looking the same – practice makes perfect I guess…
Dan
Spent 25 years on Long Island and reside in the SFO Bay Area for the past 30. I missed these so much! Buttered with my coffee on the way in to work on the L.I.E. listening to Imus when he was funnier.
Given all the effort and waiting and then sold for a measly buck makes me thankful to the Bakers in NY. But they came out as promised and I thank you Nick. If you’re going to use the convection side of the dial, check on them after 15 min.
Chris
Let’s clear some things up. Hard rolls (long or short) are your typical roll shaped for a sandwich commonly called hoagie, sub or grinder. Short are about 5″ long are 6-8″. The name refers to the crust being hard to the touch and the insides are usually airy and soft. The hard crust breaks easily and does not separate from the insides easily. As they get stale the crust gets soft and after 8 hours gets hard again. When it is stale it is not easy to break the crust and it falls off the inside in large pieces easily.
Kaiser rolls are round rolls with 4 or 5 crescent shaped cuts in the top from the center out to the edge where it touches the bottom. They are light and the crust is very thin and crispy. Normally coated with poppy seeds.
What you have here looks nice and will probably be very enjoyable but they are not Kaiser Rolls or Hard Rolls. They are just rolls.
Nick
Thanks for the comment Chris. I’m far from a naming expert and it was my first attempt at them. I just called them what Peter Reinhart calls them in his book. I consider him an authority on baking so maybe it’s a regional thing?
Anyway, whatever you call them, they are delicious.
Paul
In NJ a hard roll is a Kaiser Roll and is called a Hard Roll and/or a Kaiser Roll interchangeably. State Breakfast of NJ …..Taylor Ham, Fried Egg, slice American Cheese on a poppy seed Hard Roll/Kaiser Roll . Some diners will call it a hard roll some will call it a kaiser roll. The band Ween has a song, Pork Roll (aka Taylor Ham), Egg and Cheese. It should be hard on the outside and soft and fluffy on the inside. I don’t know if this particular recipe produces a hard roll because I am new to baking and still trying to learn but I am going to try it out. I am looking for authentic recipe for a NJ/NY hard roll/kaiser rolls. If this isn’t it than I’m wasting my time.
Lorna
I now live in Texas where they also don’t have hard rolls. Chris if you have another recipe for hard rolls please share. I’d try both as I love any and all things bread!
Pissed off
Asshole!
Chris
PS if you don;t ave malt you can add lager beer to your dough in place of some of the liquid to get a similar effect. I’ve used Bud, which worked well and also Heineken which I cannot detect in the bread.
Paul
20 ounces is 2.5 cups of flour not 4.5.
Nick
Hey Paul, I think you might to check your math. here’s a standard conversion chart:
http://www.kingarthurflour.com/recipe/master-weight-chart.html
1 cup equals 4.5 ounces of bread flour. 20/4.5 is a scant 4.5 cups.
Hope that helps!
Paul
Thanks, I don’t know how to bake.
Paul
If I use active yeast and cut everything in half will that work?
Nick
Sure. As long as you measure/weigh carefully it should work. To be honest though, it’s so much work to make them from scratch I’d always recommend making a full batch..
Paul
it says 4.25 on that website.
If I cut everything in half will it work?
Also I have ACTIVE yeast will that work?
What about the pate? If that is cut in half will it work?
What adjustments would you recommend. The instructions on the jar of yeast says to mix it with sugar water and this recipe has no sugar in it.
I want to make 5″ diameter hard rolls like you would find in NJ, NY, Germany.
Nick
Hey Paul, theoretically it would work if you cut it in half. Active yeast is fine. You don’t need to add sugar to activate it. It’ll be fine in the recipe. Good luck!
p
Only 15 ounces of flour. I think I need close to 24 ounces for 6 large 5″ diameter rolls.
Nick
That’s tough math sir. I’d just go to the store and get more flour. If the ratio is off they won’t work well. Good luck!
Siobhan
I just found this recipe and I’m excited to try it…but I have the same question as Juanita. Have you tried freezing these? At what stage? Would love to hear from you or readers if so before I do something I regret while surrounded by 14-18 fresh-baked rolls. Thanks!
suze
I haven’t tried freezing the raw dough but I freeze any we don’t eat in an hour or so in freezer zip-lock bags. They are just as good defrosted.
Marie
Oh boy I can not wait to try these. They look like they will taste like the kaiser roll of my memories. Every Sunday my father would go to the store and pick up sliced Polish ham then head to Flo’s Bakery and pick up a bunch of kaiser rolls and a brick of butter. Yep, Sunday mornings were the best. Fresh rolls smeared with creamy butter and topped with salty polish ham. All of us piled in front of the tv watching wrestling.
Vicky Durrant
I’ve been thinking about making some kaiser rolls for a party that I’m hosting this weekend, so I’m happy that I found your recipe! I really liked how you sprinkled poppy seeds over the rolls. I bet that this adds a lot of flavor to the roll! I’ll be sure to keep that in mind while I’m cooking. Thank you for sharing!
Karen
I’ve been baking bread from scratch since I was in college – many moons ago. I’ve baked MANY thousands of loaves of bread of many types,, but never got serious about finding a good kaiser roll recipe — until today.
I, like you, find it nearly impossible to find a good kaiser roll at a bakery — with the perfect combination of a crisp crust and a chewy interior. I made this recipe today and it is perfect! I am adding it to my “favorites” bread recipe file.
(When I bake breads like this requiring steam, in addition to throwing some water onto the oven floor when I begin baking, I also keep a small cruet filled with water on an oven shelf during the entire pre-heating and baking time.)
Neil Frank
Ok, I’m going to sound like a real moron but I baked these rolls at the correct temp and they burned.
I don’t know what I did wrong. I used all bread flour instead of the half all purpose in recipe and added a dough realxer to help in shaping. Anything other than that I’m stumped. I bake all the time and my stove is ok.
Can overcrowding cause it to happen? PLEASE HELP!!!!!!!
Nick
Hey Neil, I could be wrong, but I think dough relaxers can change the recommended cooking temp for baked goods. You might try it without that and see if you have better luck. My other tip would be to just double check your oven temp with an actual oven thermometer. Many stoves run 25-50 degrees hot and that can mess up a recipe like this. Good luck sir!
Angel
Kitchen sheers are gauzy curtains you use in the kitchen in the summer, as opposed to the heavy ones you use in winter. Using kitchen shears seems like a lot of wear and tear on the hands.
That said, this recipe sounds closer to what I’m looking for than the 80 or so I’ve investigated so far. Plan to play around with slow cooker and microwave to reduce these rise times, also.
Laurie Noe
Help! I just started this recipe and realize that I add the 1.5 cups water to the pate fermentee instead of just 3/4 c water. So I added more flour to make a soft dough. It is fermenting now for 90-120 minutes. Tomorrow, do I have to adjust the water in the dough to compensate for my mistake or do I have to start all over again?
Nick
Hi Laurie! I hope you figured this out but I would think you can just adjust the final water amounts to make it work. Hope they turned out okay!
Laurie Noe
Thanks that’s what I actually did. Very tasty. They look perfect. They came out of the oven about an hour ago. They are not quite as crunchy on the outside or quite as airy on the inside as I had hoped. Any suggestions?