Update: I’ve posted a newer version of this bread using two different methods besides the method in this post. Check it out here!
What I’m about to show you is something that has changed my life. When I first heard of it, I thought it seemed a bit too easy and was probably a trick of some sort. I thought, “If it was actually that easy, why doesn’t everybody do it?” After a few months of baking one loaf of no knead bread a week (at least), I can confirm that it is easy. And more people should do it.
The recipe could not be simplier. Through some trial and error, I’ve changed mine around a bit from the New York Times one.
No Knead Bread

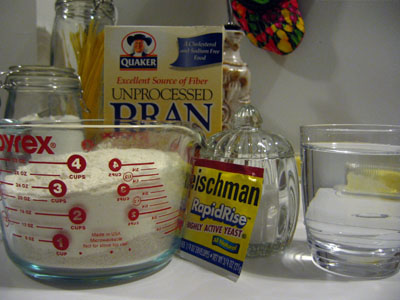
Equipment
Ingredients
- 4 cups bread flour, 500 grams
- ⅓ tsp active dry yeast
- 1 ⅔ tsp kosher salt
- 2 cups plus ⅙ cup lukewarm water
Instructions
- Mix up the dry stuff a bit before you add water just to get it all distributed. You don’t need to do any of that proofing business with the yeast. Just throw it in there.
- Add water and mix dough around with your hands. It’ll be too wet to actually knead.
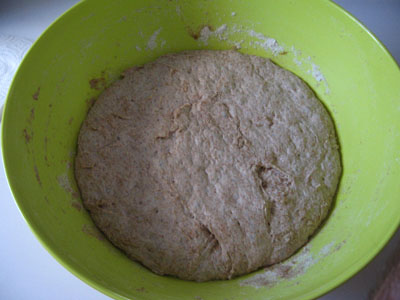
- Cover dough with plastic wrap and let it sit for 16-20 hours. It way more than doubles in size. Probably triples or quadruples.
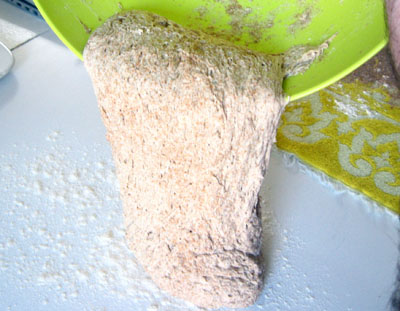
- After rising, scoop the dough onto a table that’s been heavily floured.
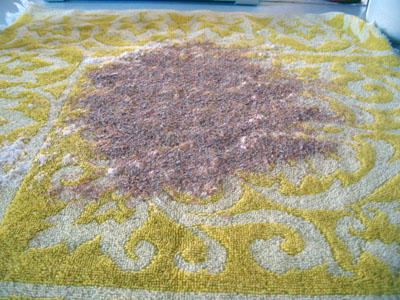
- Dust a clean dish towel with bran meal.
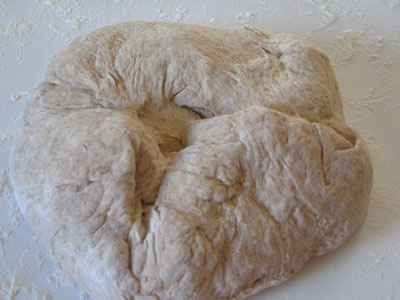
- Sprinkle some more flour on the dough and sort of fold it over into a rough round shape.
- Transfer this ball to the towel with the seam of the ball down on the towel.
- Fold over the edges of the towel and let this rise for at least an hour. I know.
- When you are thirty minutes out from baking, preheat your pot in a 500 degree oven without the lid on it.
- When pot has been heating for 30 minutes, carefully remove and transfer dough to the pot. Flip it over so the seam is now UP in the pot. Put on the lid and cook for 30 minutes at 500 degrees. Then take off the lid (watch out for the escaping steam when you take the lid off). Bake for 15 more minutes to get a nice crust.
- Let bread cool on a wire rack for at least 30 minutes before slicing into it.
Nutrition
Did you make this recipe?
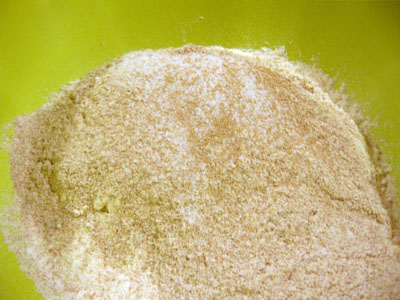
Mix up the dry stuff a bit before you add water just to get it all distributed. You don’t need to do any of that proofing business with the yeast. Just throw it in there.
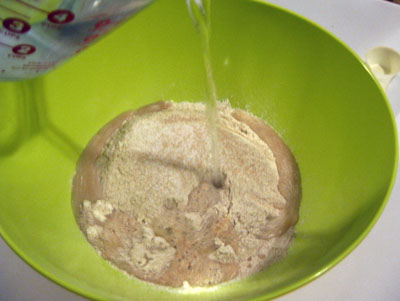
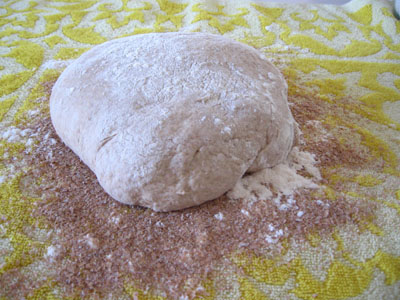
After the water is in there just kind of mix it all around with your hands. If it looks pretty you have mixed too much. Should look like this:
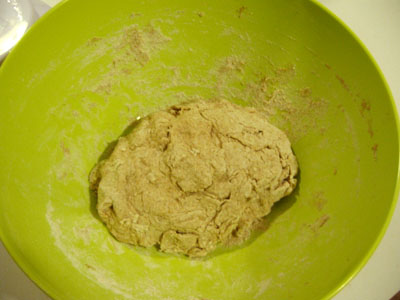
Cover that bad boy with plastic wrap and let it sit for 20 hours. It way more than doubles in size. Probably triples or quadruples.
If you touch this glob you will note that it is very moist. You couldn’t really knead it if you wanted to. So don’t. Just “pour” it onto a table with some flour.
Wait back up. The photo just reminded me. Get out a gross colored towel and put some flour and if you want bran on it like so:
Ok. Back to the dough. It is on your floured surfaced oozing. Sprinkle some more flour on it and sort of fold it over into a rough round shape. A ball. An ugly ball.
Next, pick up this wet mess and put it ugly side down on the bran/flour towel. This is the first time this concoction looks like something you would want to eat.
Fold over the edges of the towel and let this rise for 2 more hours. I know. That seems like a long time. Trust me. Worth it. Go play a video game or something.
Next you want to get out one of these.
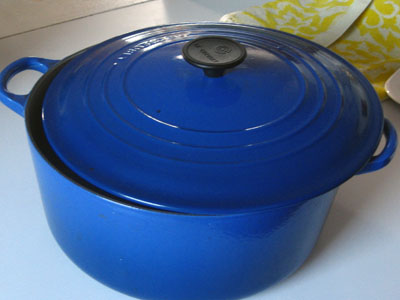
This is the hardest part about this recipe. Getting this pot. It is expensive. Obviously you don’t need this exact pot to make this bread. What you are basically looking for is a really sturdy cast iron, enamel, Pyrex or ceramic pot. You want something 6 or 8 quarts with a lid. I use this pot for everything. It is fantastic and worth every cent.
Back to the bread. The reason you want to use a pot like this is because you probably don’t have a large steam injected oven like a traditional bakery. So you need to create a smaller oven (the pot) that keeps the steam and heat from escaping. About thirty minutes before you are ready to cook, put just the pot (not lid) in the oven at 500 degrees. You want this thing blazing hot. Then take your bread and flip it again and set it in the pot. If you get it lopsided that is fine, it will straighten a bit during baking. This is what I ended up with:
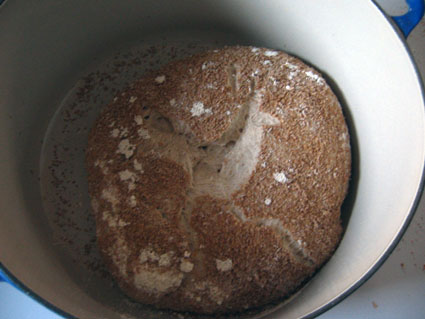
Put on the lid and cook for 30 minutes at 500 degrees. Then take off the lid (watch out for the escaping steam when you take the lid off). Bake for 15 more minutes to get a nice crust. Pull it out and try to get the bread out of the pot without burning yourself.
Then cool the beast on a wire rack. I don’t have a wire rack. I use the wire handles from my pizza stone or a spare oven rack. Same idea. You will ultimately end up with this:
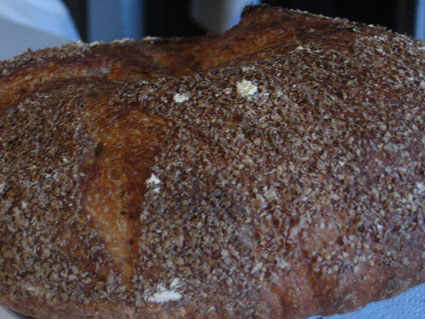
This will change your life. After eating it with sandwiches for a week or two, I tried a normal piece of store bought bread and I’m not sure I can eat it anymore as weird as that sounds.
While this post was kind of long, let me assure you, it is NOT hard. It takes a day, but probably takes less than 15 or 20 minutes of actual WORK. It’s mostly just waiting. And it is worth the wait.
Billie
I have seen this recipe several times, and wondered about it, now I know I am going to make some! Can't wait, and I'll be sure to let you know how we like it! I love, love, love homemade bread. Thanks!
Jerri
Just wondering if anyone has had success freezing the No Knead Breads?
Also, anyone have any advice for packing and shipping? Is it advisable?
Thank you! I’ve made several batches of the Kalamata version, but tonight I whipped up the dough for my first batch of the original. Love this bread so much, I may never make any other kind!
Nick
Hey Jerri, you can freeze it after baking without problem. Just make sure it’s completely cool before wrapping and freezing so it doesn’t have condensation. I’m not really sure about shipping it. I guess you could, but it might get stale by the time it got there!
Thom
Hi,
You state, "Put on the lid and cook for 30 minutes at 500 degrees."
The Le Crueset website states: "Black phenolic lid knobs and handles. Maximum use temperature 375°f".
Did your lid knob melt?
Nick
@ Thom Excellent question. No it did not. But it is a risk. I've made probably 50 loaves of bread and never had a problem. What I would recommend though is not PREHEATING the lid. Just preheat the pan without the lid on and then put the lid on for the first 30 minutes.
Never noticed any signs of melting at all on mine. Of course, I'm not advising either way as I don't want to get sued. I'm just saying that mine never has never melted.
One tip you could do is wrap the plastic knob on the lid in aluminum foil which would insulate it from direct heat.
Emily
Yeah, the no-knead method changed my life as well. As for the question about the pot lid, I took mine off when I bought it, just to be on the safe side. I just use potholders to take off the lid when it’s hot.
Tom
Caught a great tip from the “America’s Test Kitchen” show. They swapped the plastic knob on the lid for a metal drawer pull. Swapped mine. Works fantastic. No more worries of a melted knob or smelling plastic instead of baking bread.
qwerty
2 cups plus 1/6 of a cup.(of what? bran? cat fur? toenail clippings? lint?)
Nick
Haha. Thanks Qwerty. Water. Post updated.
Star raven
20 hours…like the number that comes after 19? THAT long?
nvalley
@ Star raven: The yeast has to do all the work, since you're not kneading it, and not proofing it with sugar. That's why it takes so long.
Emma
I have to admit I tried this bread without the proper covered pot( I used a preheated glass pie pan!) and it still came out delicious. I can't wait to use the cast iron pot.
kenzie
I have made this, sans awesome pot. I just heat up an empty bread pan in the oven, plop the bread on the rack, or onto a pizza peel, after preheated, then-really fast!- dump about 1-2 cups of water into that bread pan and shut the oven door fast as lightning. This has the same steaming effect if you don’t want to scout out an expensive pan.
Also, my recipe only calls for a 2 hour first rise. 20 seems WAAAAYYY too long, the bread might sink. Did you all do 20 hours for real?
Gopal
If the recipe calls for two hours only then you must be using normal amount of yeast i.e about 2 1/4 tsp for about 3 cup flour. In NKB only 1/4 tsp is required to assure retarded fermentation. Also you must be fermenting it around 85F. In NKB for retarded fermentation a recommended temperature is about 70F.
Gopal
Nick
@kenzie.
You only let the bread ferment for that long. That’s what develops the flavors. It doesn’t matter at that point if it sinks or not. Then you shape it into a loaf after that time and then let your loaf rise again for 2 hours or so.
Then you bake it ;)
Either that or you are using a WAY different recipe than me, because after two ours my mixture still looks like a lump of BLAH. It needs 14-18 hours to ferment.
Cheap Bastard
I must admit I do not have, and therefore have not tried, enameled Cast Iron pots (I use the “bare” version – $12 @ Harbour Freight). That said if you follow your link to Amazon and cut and paste the description of the pot – minus the pretentious Frenchie name – into the search bar, you find a treasure trove of Lodge brand pots (and upon closer inspection there is one from Innova also.) I don’t work for them, and I don’t sell pots, but is there a reason the Frenchie version is ~3-7/8 times the price of the Lodge (granted LC is 7-1/4 qt, the Lodge is 6 but still, even the 3-1/2qt LC brand is 2-7/8 times more expensive than the 6qt Lodge!!!) ?
I also see there is an overpriced Lodge version of a 7qt pot – but this one has a metal handle, eliminating the stupid use of plastic in high heat cookware. BTW, even if your handle does not appear to have melted, there are many deletrious effects of over heating the plastic.
I don’t want to hijack this into a pot discussion (I left that behind in my youth, thank you very much) but seriously, is there some reason.. wall thickness, extra tough enamel… something that could justify the almost 4x price? I’m cheap, but I also like quality.
Links for all…
Rob
I use a 5 qt Lodge cast iron dutch oven I picked up in Costco for $20. Initially I was using an enamel coated cast iron but it seemed the high temp was ruining it. I have clay bakers which work well also but it seems my preseasoned Lodge is the best.
Barbara C
Hey Cheap,
Yes, the french kind of pans are very expensive, but I am now going on 30 years with mine and realize that plain old cast iron will last at least that long. The reason for the porcelain is ease of cleaning and care throughout the life of the pan. Also some foods have a tendency to need extra cleaning after being cooked which would lead to a regular cast iron pan needing to be re-seasoned repeatedly; and also some foods react with the bare iron, changing the taste of the food slightly. I go to the blue pan much more than the regular cast iron pans of the same type and size for these reasons, which has led me to getting my money’s worth out of the blue one… I would be lost without it. Try checking estate sales for the blue kind; also some other cooks out there have their own lines of porcelain lined pans for much less money. However, a cast iron pan such as the brands you suggested work great too; and the great thing about the kinds you are talking about is that they can just be tossed onto a grill when camping or cooking out. I hope this helps.
Cheap Bastard
well apparently I can’t use these XHTML tags… (or I don’t know how.) sorry the links did not make it.
Whollyfool
I have made this bread and found it wonderful…. I use an Anchor Hocking 4 qt bowl that I got as part of a 4 piece set at Meijers for $15. I cover the top with aluminum foil, and it works fine. I would definitely rather have a real cast iron dutch oven, but being unemployed definitely limits your options. :-P
I think the difference between this bread and the bread Kenzie makes is probably yeast content. This bread has almost no yeast in it, which is another reason to find it wonderful. :)
Gopal
Hi Whollyfool,
How to cover the preheated bowl with aluminium foil after putting in the dough?
Gopal
Joe H. Bones'
I make this using a cast iron 10 inch frying pan, and it turns out great ! Cover it with aluminum foil ,and there's no problem. Never made it with roasted garlic, but am in the process of making it right now !. I've bought stuff w/garlic and like it very much, so I'm sure this will be fantastic !
Great site. Joe
Suzie Barden
I've been wanting to make this bread for quite some time now and thanks to my Mother-in-law giving me a dutch oven for Christmas, I finally made it!
Love the crust and love the texture of the bread. Only disappointment was it was a tad bland. Is there a way to add a bit more flavor? I used both the bread flour and the whole wheat flour. Should I add a little sugar? Anny help would be much appreciated. Thanks!
-Suzie
Suzie Barden
Hi, me again. So… I have to admit to a mistake I made. I said earlier that I used both bread flour and whole wheat flour to make this bread and I didn't. I looked again and I used unbleached flour instead of the whole wheat… My bad. I remade this with the whole wheat and Wow! What a difference that makes! This bread is amazing!!!
So, sorry about what I said earlier. Who am I to doubt you?!?
john
Can you use instant dry yeast here?
Rob
I’ve been making this bread and variations of it for 4 years (since Nov 2008) and it started in 2006 with Lahey and Bittman. I found it by accident thinking it was a batter bread. I’m making Ciabatta rolls now, only using ABin5 method this time. I use both methods for different breads.
Zoe
Sorry for all the questions, Nick. I’ve been making this bread once a week for the past 3-4 weeks and it’s amazing. (This week, I tried whole wheat for the first time — yummy!). But I find that it’s a little too doughy on the inside sometimes. If I increase the time, though, I risk burning the bottom of the bread in the dutch oven (sometimes it gets a little burned even before I take off the lid). I figure, if I’m increasing the time, better to do it before I take off the lid. But I’m wondering if you have any other suggestions or if you’ve ever run into this problem.
Nick
Hey Zoe, I can’t say I’ve ever had that problem… if it’s too doughy on the inside it probably needs to cook for a bit longer for sure. To combat the burning, I would say raise the level in the oven that you are baking it maybe? If it’s very low in the oven, it might be getting too much direct heat on the bottom of the pan. Good luck!
Joe a
You call for active dry yeast, I have seen this recipe before using instant yeast. Does it make a difference??
Stephanie
Hello!
Will 24 hours be too long at room temperature?
Just trying to fit this into my work schedule lol.
Thanks!!
Nick
Hey Stephanie, I think 24 hours is probably fine. I wouldn’t go much over that though. You can probably reduce the second rise time to around an hour also.
Good luck!
Stephanie
Thanks, Nick!!
Jen
This is my second attempt at this bread the first one after waiting for so many hours came out very very wet there was no way it was getting shaped in to a ball, I threw it away. My second attempt has done the same thing,this time I kept adding flour until I could form a all. I’m sure all that flour has screwed it up but I didn’t want to wast another batch. Has anyone else had this issue?
Nick
Hey Jen, it’s impossible to shape it into a perfect ball. The dough is always too wet for that. You have to use a good amount of flour to get it to form a loaf. If you look at my photos, you can almost pour the dough it’s so wet. That’s totally fine.
Just keep at it, let the dough rise a second time on a towel and then fold it into a hot dutch oven.
Should work great! Good luck!
Jen
The dough was so wet it was sliding off the towel,LOL. I was just worried about adding to much flour. I have always had bad luck with anything that requires yeast. I am about to bake it and I will let you know how it turns out.
Jen
Ok I just took it out of the oven and it looks amazing,letting it cool a bit before I cut into it. I can’t wait to make this again and try adding in herbs or cheese.
Liza
Hi this is actually for the no knead bread recipe, I made it and it came out a lil wet inside and was very wet after proofing as dough before baking. I don’t know if I added too much yeast or water. My ? is do you measure your water on a fluid ounces cup or is that needed. I just used a glass measuring cup. Thanks
Nick
Hey Liza, I’m going to move this comment to the bread post since that’s what it’s about, but to answer your question, I just use a normal measuring cup to measure my water. The dough should be very wet after proofing. Like sticky wet. If it was still wet on the inside after baking, it could be that your oven isn’t the right temp (check with an oven thermometer) or you might just need to add 5 minutes onto the baking time. Good luck!
Zoe
Hey Nick, I made your olive bread last week (YUM!), this morning I made the plain version. I used the tea towel like you said and put loads of flour on it, but the dough still stuck to the towel, so it’s a bit flat because it sunk when i pulled the towel off. I’m sure it still tastes amazing, but any ideas how to stop it sticking to the towel?
Nick
Hey Zoe, sometimes I use a little bit of cornmeal mixed in with the flour and that gives it a lot of crust and also some sturdiness on the towel. Also… just lots of flour. You can’t really have too much as extra just won’t stick and what will stick makes a great crust. Glad the olive loaf came out okay!
Marty
Hey Nick,
Thanks for this post – can’t wait to try it… except that my cast iron dutch oven is only 3 quarts (with probably an additional inch of room since its lid is a cast iron pan). Do you think the resulting loaf would still fit? Or, would I need to cut the ingredients down to a smaller yield/loaf size? Or, make the dough a bit flatter…? I’m a total rookie with this so appreciate your help!
Nick
Hey Marty, with a 3 quart pan I would half the loaf size just to make sure it bakes evenly. Because of that you can reduce the cooking time by 10 minutes also.
Good luck!
Marty
Thanks – it worked! Been making my own bread every weekend since I asked you and it’s been great. Going to share your blog on my fb page. :) Thanks again, Nick.
Nick
Awesome! Thanks for the share Marty!
Menupage
I really glad to find this web site on bing, just what I was looking for: D too saved to bookmarks.
brunda
Can I use whole wheat flour ( in place of bread flour)?
( bread flour not a available easily here in India )
Nick
Hi Brunda, I would use half whole wheat and half all-purpose flour if you can find that. Good luck!
Sharron Arnold
Nick, I have seen so often, people mention to heavily flour a towel and dump the dough on it for the second rise. The beauty of a long ferment is that it changes the structure of the flour and gluten etc so people who are gluten intolerant can mostly eat this bread. The extra flour added from the towel is NOT fermented therefore not suitable for gluten intolerant so. Why not just do a 2nd rise in the original pan, without added X tra flour!?
Nick
Hey Sharron, I must say I’ve never heard that research before… be curious if you have a link for it. You could use cornmeal to coat the dough. I think if you did the second rise in the pan it would probably stick really bad during baking.
Julie’s Pantry – Macheesmo
[…] Dipping Oil – Make this bread or this bread. Take the next bus to […]